Assembling a fire pit table sounds intimidating until you actually do it. Most propane fire tables ship flat-packed with 30 to 50 individual parts, and the idea of turning a stack of steel panels, ceramic tiles, and hardware bags into a working fire feature can feel overwhelming. In practice, the job takes one person about 45 to 90 minutes with nothing more than a standard wrench and a screwdriver.
This guide walks through every stage of fire pit table assembly, from opening the box to lighting the first flame. The steps below are based on a hands-on build of a 42-inch rectangular propane fire table, but the general sequence applies to most gas fire pit tables on the market.
What to Expect When You Open the Box
A typical fire pit table arrives in a single large box weighing anywhere from 70 to 100 lbs. As demonstrated in MR. GREG'S HOW TO review of a BALI OUTDOORS 42-inch model, the package tipped the scales at roughly 94 to 95 lbs owing to its solid steel construction.
Inside, you should find:
- Steel base panels — four side panels and a bottom support frame, each wrapped individually to prevent scratches during shipping.
- Tabletop components — ceramic tile inserts (usually two sizes, such as four large tiles and two smaller ones) plus a steel frame that holds everything together.
- Fire media — a bag of fire glass (commonly blue tempered glass rocks) that fills the burner tray.
- Burner assembly — the gas burner ring or tray, gas hose, regulator, and ignition module.
- Hardware bag — bolts, screws, foam bumpers, and any brackets. Better manufacturers label each bag by assembly step so you are not sorting through a pile of identical-looking fasteners.
- Instruction manual — look for one that combines drawings with written steps. Photo-only or text-only manuals slow you down.
- Protective lid — a metal or composite cover that converts the burner area into a flat table surface when the fire is off.
Tip: Before you start, lay every component out on a clean surface and cross-check against the parts list. Finding a missing bolt 40 minutes into the build is frustrating. Finding it before you start is a two-minute inventory.
Tools You Will Need
Most fire pit tables can be assembled with tools you already own. Here is the short list:
Required
- Adjustable wrench or the wrench size specified in your manual (commonly 7/16" or 10mm)
- Phillips-head screwdriver
- AAA or AA battery for the electronic ignition (check your manual for the correct size)
Optional but Helpful
- Cordless power driver: Speeds up fastening significantly. Hand-tighten every bolt first, then go back with the driver to snug them down. Going straight to power risks cross-threading.
- Work gloves: Steel edges on the base panels can be sharp before the frame is fully assembled.
- A second person: Not strictly necessary, but helpful for flipping the partially assembled base upright if the unit weighs over 80 lbs.
Step-by-Step Assembly
The exact bolt count varies by model, but the assembly sequence follows the same logic across virtually all rectangular propane fire tables. Build from the bottom up: frame first, then functional components, then cosmetic finishing.
Step 1: Assemble the Base Frame
Start with the four side panels and the bottom support. Most designs use a tab-and-slot system where the panels interlock before you add bolts. Line up the pre-drilled holes, drop in the bolts, and hand-tighten only. Do not fully torque anything until all four sides are connected and square.
Once the frame is standing, check that the corners are flush and the unit does not rock on a flat surface. Then go around and tighten each bolt in a star pattern (opposite corners first) so the frame pulls together evenly.
Step 2: Install Foam Bumpers
This step is easy to rush through and easy to get wrong. The foam bumpers are adhesive-backed pads that stick to the top edge of the steel frame. They serve two purposes: they cushion the ceramic tiles so they do not crack against bare steel, and they create a slight friction grip that keeps the tiles from sliding.
Your instruction manual will show exact placement positions. Follow them precisely. If a bumper ends up a half-inch off, the tile above it may sit unevenly or wobble when someone sets a drink down. As noted in the hands-on review, these bumpers are what give the tiles "a nice foundation," and misplacing them is one of the most common assembly mistakes.
Step 3: Place the Ceramic Tiles
Fire pit table tiles typically come in two sizes. On the 42-inch BALI OUTDOORS model, that means four larger tiles and two smaller tiles. The instruction manual includes a tile layout diagram showing which size goes where.
Lay the tiles onto the foam bumpers according to the diagram. They should sit flat with minimal gaps between them. If a tile rocks or a gap is wider than about 1/8 inch, check that the bumpers underneath are positioned correctly.
One advantage of tile-top fire tables is that the tiles are swappable. If your patio decor changes down the road, you can replace the tiles without replacing the entire table. This is worth keeping in mind if you tend to refresh your outdoor setup every few seasons.
Step 4: Add the Fire Glass
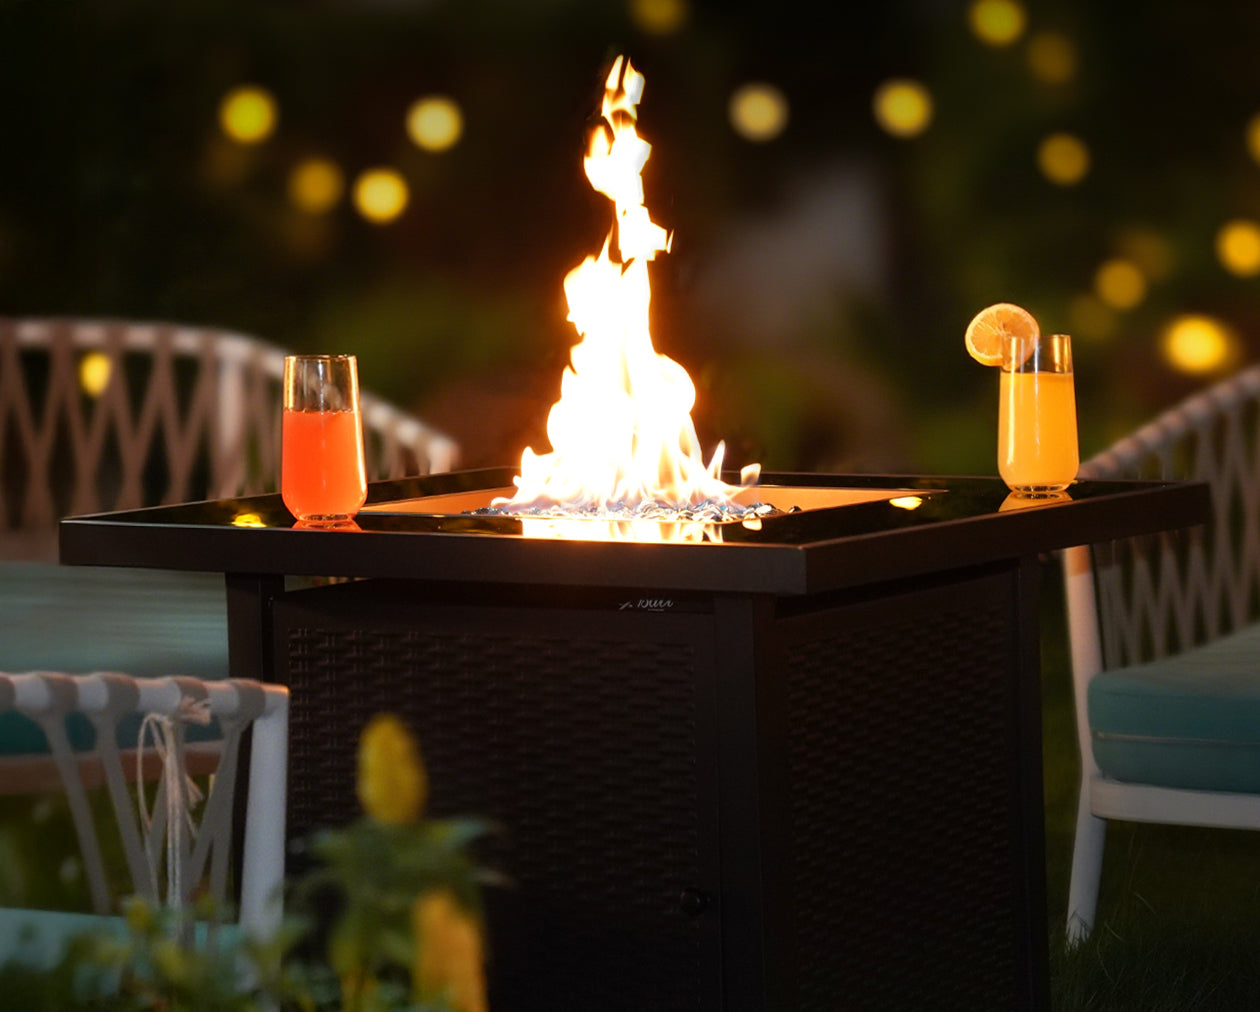
Pour the fire glass into the center burner tray. Spread it evenly so the glass covers the burner but does not pile up above the rim of the tray. One critical detail: do not completely bury the vent box or ignition port under the glass. These need to remain accessible for airflow and lighting.
The standard fire media included with most fire tables is tempered glass, which can withstand direct flame without cracking, popping, or releasing fumes. If your table has a removable glass topper that doubles as a dining surface, our fire table glass topper guide covers sizing, care, and replacement.
Step 5: Connect the Propane Tank
Open the access door on the base of the table. On most models, this is a magnetic door on one side panel that swings open without tools. Slide a standard 20 lb propane tank into the cabinet, connect the regulator hose to the tank valve, and hand-tighten the coupling. Do not use a wrench on the regulator connection — over-tightening can damage the brass fitting.
Once connected, open the tank valve slowly (one full turn) and check for the smell of gas around the connection point. If you detect any odor, close the valve, disconnect the hose, and reattach it. For a soapy-water leak test method and detailed propane safety steps, read our propane fire pit buying guide.
When the tank is connected and the door is closed, the propane is completely hidden inside the table base, giving the unit a clean, finished look from every angle.
First Ignition: Lighting Your Fire Table
With the assembly complete and the propane connected, it is time to test the fire. Here is the standard ignition sequence for tables with pulse (electronic) ignition:
- Insert the battery. Most pulse ignition modules use a single AAA battery. The battery compartment is usually near the control knob.
- Remove the protective lid from the burner area.
- Open the propane tank valve by turning it counterclockwise one full turn.
- Push and turn the control knob to the ignite or pilot position. Hold it in for 5 to 10 seconds. You should hear a clicking sound from the igniter and see the flame catch on the burner.
- Release the knob once the flame is established, then turn it to adjust the flame height from low to high.
If the flame does not catch on the first try, wait 30 seconds for any accumulated gas to dissipate, then repeat. It is common for the first ignition to take two or three attempts because air is still in the gas line.
Common Assembly Mistakes and How to Avoid Them
After reading through dozens of assembly reviews and forum threads, the same handful of errors show up repeatedly. Here is what to watch for:
| Mistake | What Happens | How to Prevent It |
|---|---|---|
| Tightening bolts before all panels are connected | Frame goes out of square; later panels do not line up | Hand-tighten only until every panel is in place |
| Misplacing foam bumpers | Tiles sit unevenly, rock, or crack over time | Follow the placement diagram exactly |
| Burying the vent box under fire glass | Restricted airflow; ignition problems | Keep the vent box and ignition port visible above the glass line |
| Over-tightening the propane regulator | Damaged brass fitting; potential gas leak | Hand-tighten only — no wrench |
| Skipping the leak test | Undetected gas leak creates a safety hazard | Spray soapy water on every connection and check for bubbles |
| Forgetting the ignition battery | Clicking sound but no spark; no flame | Insert the battery before the first test |
Daily Use Tips
Once your fire table is assembled and tested, a few habits will help you get the most out of it:
- Adjust the flame for the occasion. Full blast is great for cold nights, but a low flame creates better ambiance for conversation and keeps the table surface cooler for setting drinks nearby.
- Use the table surface. When the fire is off and the lid is on, the table works as a regular outdoor coffee table or dining surface. The 42-inch model offers enough ledge space on both sides for plates, glasses, and serving trays.
- Add a wind guard. On breezy evenings, a tempered glass wind guard keeps the flame steady and visible instead of whipping sideways. It also reduces gas consumption because the burner does not have to fight the wind. Our fire table wind guard guide covers sizing and installation.
- Keep the control panel side accessible. Position the table so the knob and propane door face you or face the house, not the guests. The opposite side panel is solid, giving visitors a cleaner look.
- Roast with caution. Marshmallows and s'mores work fine over a propane fire table. Just keep food directly over the flame, not resting on the fire glass, and supervise children closely.
Maintenance and Seasonal Care
A well-maintained fire table lasts for years. The solid steel construction on quality models like the 42-inch BALI OUTDOORS unit means the frame itself is built to endure multiple seasons, but the finish, gas components, and fire media all need periodic attention.
After Every Use
- Turn the control knob to the off position.
- Close the propane tank valve.
- Place the protective lid over the burner to keep out leaves, insects, and moisture.
Monthly
- Wipe down the ceramic tiles and steel frame with a damp cloth. Avoid abrasive cleaners that can damage the powder coating.
- Remove the fire glass and rinse it with water to clear dust and soot buildup. Let it dry completely before returning it to the tray.
- Inspect the gas hose for cracks, and test connections with soapy water. The U.S. Consumer Product Safety Commission (CPSC) recommends this bubble test at the start of each season and any time you reconnect the tank.
End of Season
- Disconnect the propane tank and store it upright in a well-ventilated outdoor area, away from the house.
- Clean the burner ports with a soft brush or compressed air to remove any debris.
- Cover the entire table with a fitted weather cover. Look for 600D polyester with a drawstring or elastic hem to keep it from blowing off. You can find the right size in our fire table cover collection.
- If your area gets heavy snow or freezing rain, move the table to a sheltered area such as a covered porch or garage.
Checking the Finish
Inspect the powder coating twice a year for chips or scratches. Bare steel exposed to rain will rust quickly. Touch up any spots with a high-heat spray paint rated for outdoor metal. This five-minute fix prevents a problem that would otherwise require a full refinish or panel replacement.
Is a Fire Pit Table Worth the Assembly Effort?
The honest answer is yes, and the effort is less than most people expect. A typical build takes under 90 minutes, requires no special tools, and the result is a piece of outdoor furniture that works as both a heat source and a table surface. As the reviewer in the hands-on test put it after assembling the BALI OUTDOORS 42-inch model: "Both sturdy and multi-functional, and a great addition to outdoor living space."
If you are still deciding which size or shape fits your patio, start with our rectangular fire table guide for a full sizing chart and layout comparison. And if you want to see the full range of options, browse the complete fire table collection.