An outdoor fire table does something no other patio feature can: it turns a regular backyard into the place everyone wants to be. The warmth on a cool evening, the way conversations naturally slow down around an open flame, the extra hour you stay outside because nobody wants to leave. It all adds up to something worth getting right from the start.
But getting it right means more than pulling the table out of the box and lighting it up. A proper fire table setup protects your home, your family, and the table itself. This guide walks you through every step, from choosing the right spot to seasonal maintenance, so you can enjoy your outdoor fire table for years without worry.
Pre-Setup Checklist: What You Need Before You Start
Before you unbox anything, take ten minutes to confirm the basics. Skipping this step is the number one reason people end up moving their fire table after the fact, and that's a lot harder once a 20-pound propane tank is connected.
Choose the Right Surface
Your fire table needs a flat, level, non-combustible surface. Concrete patios, natural stone, pavers, and brick all work well. Composite decking and wood decks can work too, but you'll want a fire-rated pad underneath. The radiant heat from the base won't scorch most decking materials, but it's a smart precaution.
Grass and bare soil are not ideal. Uneven ground makes the table wobble, and moisture from below can accelerate rust on the base over time.
Confirm Your Clearances
The National Fire Protection Association (NFPA) recommends a minimum of 10 feet of clearance from any combustible structure — that includes your house siding, wooden fences, pergola posts, and patio umbrellas. Overhead clearance matters just as much. Never place a fire table under a covered porch, pergola, or awning unless the structure carries an explicit heat rating for open flame appliances.
Keep the area directly around the table free of anything that could catch a spark or melt: cushions, tablecloths, hanging plants, and string lights should all stay outside that 10-foot radius.
Gather Your Supplies
- A standard 20 lb propane tank (filled and inspected)
- Dish soap and a spray bottle for leak testing
- A bubble level
- The included regulator and hose (check your manual — aftermarket regulators can void warranties)
- Fire glass or lava rocks (if not pre-included)
Step-by-Step Fire Table Setup
With your location chosen and supplies ready, here's exactly how to get your BALI OUTDOORS fire table from box to first flame.
Step 1: Unbox and Inspect
Remove all packaging and lay out every component. Check the burner pan, ignition assembly, regulator hose, and fire media against the parts list in your manual. Look for any shipping damage. Dents in the burner pan or kinks in the gas hose are deal-breakers that need to be resolved before you proceed.
Step 2: Position and Level the Table
Move the table to your chosen spot and use a bubble level across the top in both directions. Most fire tables have adjustable feet — use them. A level table ensures even flame distribution and prevents the propane tank from shifting inside the base compartment.
Step 3: Connect the Propane Tank
Open the base access door and slide the 20 lb tank into position. BALI OUTDOORS fire tables are designed with a hidden tank compartment that keeps the tank out of sight while allowing proper ventilation.
- Make sure the tank valve is fully closed (turn clockwise until snug).
- Attach the regulator to the tank valve. Hand-tighten only, because over-tightening can damage the brass fitting.
- Connect the other end of the hose to the table's gas inlet, following your model's specific instructions.
- Open the tank valve slowly — one full turn is enough for testing.
Step 4: Perform a Leak Test
This step is non-negotiable. Mix dish soap with water in a spray bottle and spray every connection point: the tank valve, the regulator fitting, and the gas inlet on the table. Open the tank valve with the burner off. If you see bubbles forming at any connection, you have a leak. Tighten the fitting and test again. If bubbles persist, do not use the table — contact customer support.

Step 5: Test the Ignition
With the tank valve open, turn the control knob to the ignite/pilot position and press the pulse ignition button. You should hear a clicking sound and see the burner light within 2-3 attempts. If it doesn't ignite after 5 tries, turn everything off, wait 5 minutes for any accumulated gas to disperse, and try again.
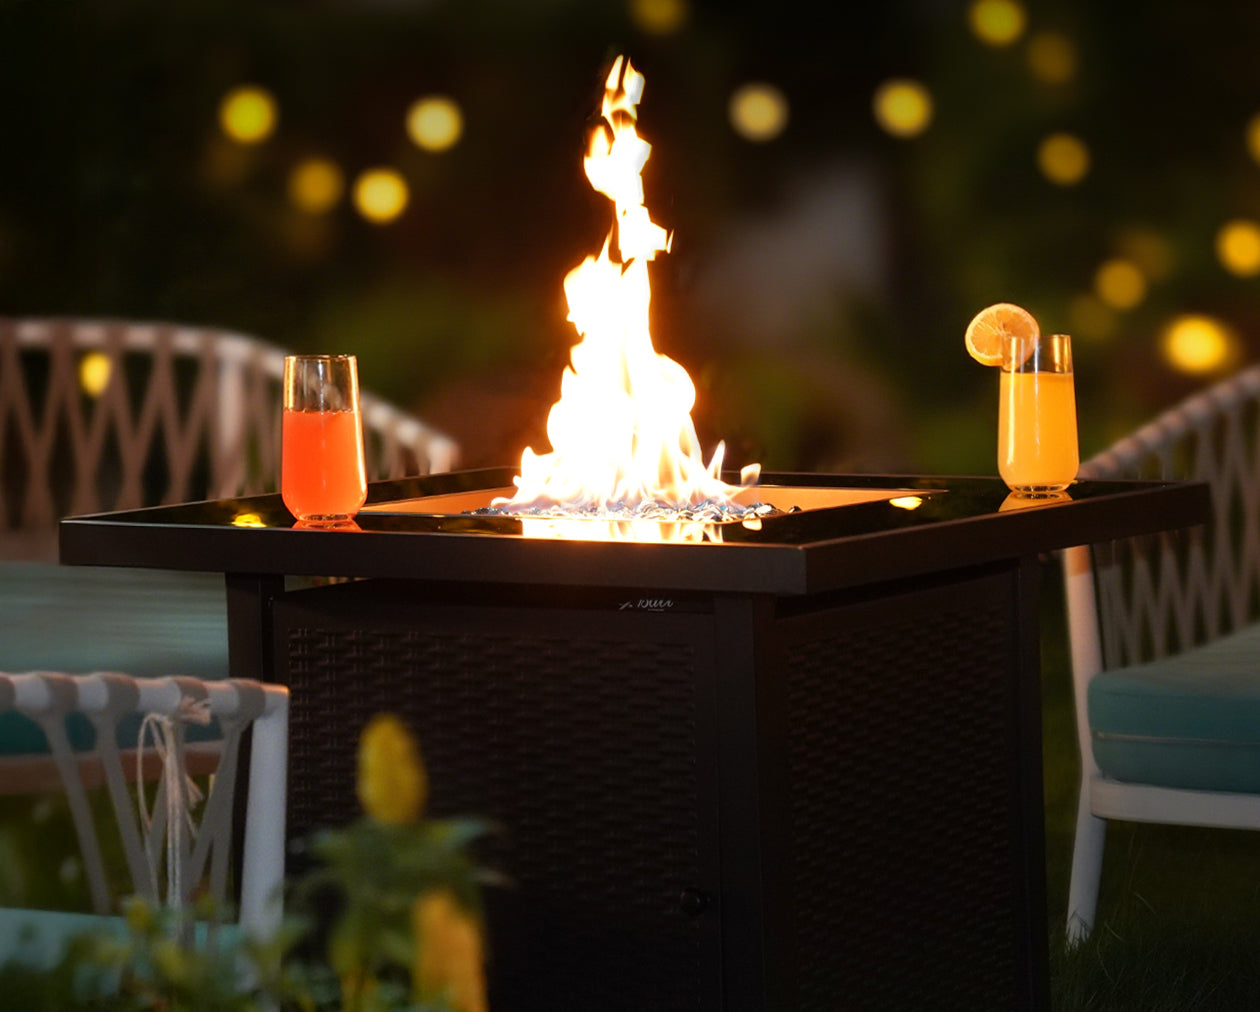
Step 6: Add Fire Glass
Once you've confirmed a clean, even flame from the bare burner, turn off the gas and let the burner cool completely. Then spread your fire glass or lava rocks evenly over and around the burner. Don't pile media directly on top of the burner ports. Keep it level with or just below the top of the burner ring for the best flame pattern.
Not sure which media to choose? Tempered fire glass creates a more refined, reflective look, while lava rocks offer a natural, rugged aesthetic. Both are safe for propane fire tables.
Safety Clearances: The Numbers That Matter
Let's consolidate the critical distances in one place:

| Clearance Type | Minimum Distance | Notes |
|---|---|---|
| From combustible structures | 10 feet | House walls, fences, sheds, pergolas |
| Overhead clearance | Open sky preferred | No standard patio covers or umbrellas |
| From seating | 2–3 feet | Close enough to enjoy, far enough to stay safe |
| From property lines | Check local codes | Some jurisdictions require 15 ft minimum |
Always check your local fire codes and HOA rules. Some municipalities ban open-flame appliances on apartment balconies or within certain distances of property boundaries. A quick call to your local fire marshal's office can save you a fine — or worse.
Propane Safety: Respect the Fuel
Propane is a safe, clean-burning fuel when handled correctly. Here are the rules that keep it that way:
Tank Inspection
Before each season, inspect your propane tank for rust, dents, and damage to the valve assembly. Tanks have a 12-year certification life from the manufacture date (stamped on the collar). After that, they need recertification or replacement. Most hardware stores and propane exchanges won't fill an expired tank — and you shouldn't use one.
The Soapy Water Test
Run a leak test every time you connect a new or refilled tank. It takes 30 seconds and could prevent a serious incident. If you ever smell gas (that distinctive rotten-egg odor) while the burner is off, shut the tank valve immediately, move away from the area, and do not ignite any flame or spark until the gas has fully dispersed.
Storage Rules
- Never store propane tanks indoors — not in a garage, basement, or shed. Propane is heavier than air and pools at floor level, creating an invisible explosion risk.
- Store tanks upright, in a shaded, ventilated outdoor area.
- During long-term storage, disconnect the regulator and cap the tank valve.
- Transport tanks in an upright position with windows open for ventilation.
Wind Management: When to Use a Wind Guard
Wind is the most common day-to-day challenge with outdoor fire tables. Light breezes under 10 mph simply make the flames dance, and that's part of the appeal. But moderate wind in the 10-20 mph range starts pushing flames to one side, reducing heat output and potentially directing flames toward nearby objects.

A wind guard is the simplest fix. These tempered glass panels surround the flame area, blocking wind while keeping the full visual effect of the fire. They're one of the most worthwhile accessories you can add to your fire table setup.
When to shut off entirely: If sustained winds exceed 20 mph or gusts are unpredictable, shut down the fire table. No wind guard can handle gusts strong enough to blow debris into the flame area, and the risk of embers or redirected heat simply isn't worth it.
Seasonal Maintenance Routine
A fire table that gets 15 minutes of maintenance at the start and end of each season will last for years. If you also own a chiminea, the chiminea safety guide covers similar seasonal care for that type of fire feature. Here's the fire table routine:
Start of Season (Spring)
- Inspect all gas connections. Check the regulator hose for cracks, dry rot, or pest damage. Spiders love nesting in regulators over winter. Replace any damaged components before connecting the tank.
- Clean the burner. Remove the fire media and brush out any debris from the burner ports with a soft brush. Clogged ports cause uneven flames and can create dangerous hot spots.
- Check the ignition system. Test the pulse igniter. If it clicks but won't spark, the electrode may need cleaning or replacement.
- Run a full leak test with fresh soapy water on every connection.
- Inspect the fire media. Cracked or discolored fire glass should be replaced. Lava rocks break down over time — swap them out if they're crumbling.
End of Season (Fall)
- Disconnect and properly store the propane tank.
- Clean all surfaces and remove fire media if storing the table indoors.
- Cover the table with a properly fitted fire table cover. A cover that's too loose traps moisture and flaps in the wind. Too tight, and condensation builds up. Check our cover sizing guide to find the right fit.
7 Common Setup Mistakes (and How to Avoid Them)
After helping thousands of customers get their fire tables running, these are the mistakes we see most often:
- Placing the table too close to the house. People want the fire table near seating, which tends to be near the house. Measure the 10-foot clearance from your furthest combustible point — often the roof overhang, not the wall.
- Over-tightening gas connections. Brass fittings don't need a wrench. Hand-tight plus a quarter turn is plenty. Over-tightening strips threads and actually causes leaks.
- Skipping the leak test. "I'll do it next time" is how gas leaks go undetected. Make it automatic — every new tank connection gets tested.
- Piling fire glass too high. More glass doesn't mean bigger flames. It actually chokes the burner, produces uneven flames, and can cause the glass to overheat and crack. Keep media level with the top of the burner.
- Using the wrong fire media. Regular decorative glass, river rocks, and ceramic stones can explode when heated. Only use tempered fire glass or fire-rated lava rocks specifically designed for gas fire features.
- Ignoring the wind. Operating without a wind guard on a breezy evening doesn't just reduce enjoyment — it pushes flames in unpredictable directions. If you're in a windy area, a wind guard should be part of your initial setup, not an afterthought.
- Never covering the table. Rain, leaves, pollen, and UV exposure degrade every component over time. A quality cover is the single cheapest way to extend your fire table's life by years.
Choosing the Right Fire Table for Your Space
If you're still in the decision-making phase, the shape and size of your fire table should match your patio layout and seating arrangement. Square fire tables work well in smaller spaces and create an intimate setting for 4-6 people. Rectangular fire tables are ideal for longer seating arrangements and make a bold visual statement as a patio centerpiece.
Not sure which shape fits your space best? Our shape comparison guide breaks down the pros and cons of each option. And if you're just getting started with your research, the propane fire table buying guide covers everything from BTU output to material choices.
Enjoy the Fire — Safely
Setting up an outdoor fire table isn't complicated, but it does reward careful attention. Take the time to choose the right spot, test every gas connection, and build a simple maintenance habit. The payoff is hundreds of evenings gathered around real flames with no smoke, no ash, and almost no upkeep.
Your BALI OUTDOORS fire table was built to keep things simple: pulse ignition, hidden tank storage, and 50,000 BTU of clean-burning warmth. Once the setup is done right, all that's left is to pull up a chair and enjoy it.